Monday, November 29, 2010

Shoe Side Step Card

Side step cards look really complex, but they are very easy.  It is mainly just a matter of cutting and scoring in the right places.

Supplies:
  • White cardstock - 5 1/2 x 8 1/2
  • Pink shimmer paper 5 1/2 x 4 1/4
  • Red shimmer paper
  • Cream Shimmer paper
  • Glue Dots
  • White satin ribbon 18 inches
  • Computer generated sentiment (Font is Penhurst)
  • Swirls Cuttlebug folder


Measuring in 1 1/2 inches, cut from 1" to 6  3/8".  Then score at 1, 2, 3 1/8, 4 1/4 & 6 3/8 (only score from the cutline, except at 4 1/4 you score all the way across).  Then make mountain and valley folds. The first score line will be a mountain, then valley, etc.  For the 4 1/4 score line, the smaller side is a mountain fold and the wider side is a valley fold.   I then embossed the pink shimmer paper with my cuttlebug   By cutting a 4 x 3 1/4 piece out of the shimmer paper, I was able to make the piece that fits perfectly onto the "L" shape. The second stairstep is cut at 4 x 1 1/8 and the final stairstep is cut at 4 x 2 1/8.

Bowmaking tip: I bought the Ultimate Crafter's Companion.  The only part of this that I use is the pegs for making my bows.  To save money, you could easily make your own bow maker.  Take a small board and drill holes at several different incriments and cut 3" pieces of a small dowel to fit into the holes.  You just wrap the ribbon around the 2 pegs (which forms the loops of the bow) and then take the piece that is on the bottom under the loops (between the pegs) and then tie a knot).  It is super easy.  To make a double bow, such as the one on this card, you simply use two pieces of ribbon. 

Another item that could be purchased is something called a Bow Easy.  I don't have one, but I saw a video demonstrating how to use it and it looks like it is very easy to use.

Monday, November 22, 2010

Welcome to Our Pad Wall Hanging

I made this wall hanging for my friend Kelly who loves frogs. 

Supplies:
  • 10 1/2 x 10 1/2 white cardstock
  • 6 x 12 medium green
  • 6 x 12 light green cardstock
  • 2 feet green ribbon
  • Glue dot


The frogs were cut at 4.5 x 10 from Paper Dolls Dress Up.  The lily pad was made using an oval and oblong heart from George.  The oval is 2.62 x 5.10 and the heart is 2.83 x 3.4 and a 140 degree rotation.  I tied a double bow and attached it with a glue dot.

Matthew 10:29-31 Wall Hanging

This is a cute little wall hanging I made for a dear friend as a Christmas gift.

Supplies:
  • 2 sheets 12 x 12 black cardstock
  • 11 x 11 white cardstock
  • 3 x 12 pink cardstock
  • 6 mini brads
  • 2 feet pink ribbon
  • Popdots


This is pretty straight forward.  I adhered the white cardstock to the black.  I cut branch at 8.74 x 5.72 from Home Decor and cut the bird twice at 3.16 x 2.04.  I cut 12 flowers from Home Decor and hid the center.  The top flower layer I scored the flowers into 5 petals and then using my paper piercing tool, I gently curled each petal around the piercing tool.  I poked a small hole into the center of each and then put a mini brad into the center.  I put a popdot on the back of each and adhered them to the branch.

A nice ribbon saving technique that I like to use is to cut 2 pieces of ribbon; the first piece should be about 3-4 inches longer than the area where you want to put it and the second should be about 1 1/2 - 3 inches (these measurements of course depend on how big the place you are putting the ribbon is.  Next tie a loose knot into the center of the longer piece.  Slide the shorter piece into the loose knot and pull both ends of the longer piece straight out.  Then just adhere the  two endsto the back of the piece you areputting the ribbon on.

Sunday, November 21, 2010

Gift of Cards (Part 10)

This is a double display card.  It is a very similar type of card as the tri-panel shutter card.

Supplies:
  • Red cardstock 6 x 12
  • Green cardstock
  • Designer Paper (2 patterns) 3 x 12
  • Pearls
  • Popdots


Measure in 1 inch and cut from 1" to 5" and pick up the cutting blade and cut from 7" to 11".  Flip the card over and repeat this step.  Then score between 0 and 1 1/2" and then between 5 and 6 1/2" at 1", 5", 7" & 11".  Score all the way down at 2", 4", 8" & 10". Cut pieces of the patterned paper to fit each box (trim off about 1/8").  I cut a Tag Shadow from Gypsy Wanderings.  Adhered the computer genreated sentiment.  I also added 2 pearls (after I took the photo) on either side of the tag.  I popdotted the tag on one side.

Gift of Cards (Part 10)

This card is called a Surprise Pop-up card.

Supplies:
  • Bronze metallic paper
  • Pink metallic paper
  • Brown metallic paper
  • White cardstock
  • Popdots


Ok this is another card type that is going to be easier to post a video for the basic directions.

Surprise Pop-up Slider card

I cut the pig three times and cut the head off one and the snout off the other and layered them to givesome depth.  I cut the turkey twice and cut the leg off of one.  I also Cut the shift feature for the turkey once.  The only difference in my card construction is that I put popdots between the two layers since my surprise has some  depth (the turkey).

GIft of Cards (Part 9)

Another fairly simple card.

Supplies:
  • White cardstock
  • Black cardstock
  • Popdots
  • Swiss dots Cuttlebug folder
  • Computer generated sentiment


Gift of Cards (Part 8)

This is called a Tri-Fold Shutter card

Supplies:
  • White cardstock 6 x12
  • Red cardstock 3 x 12
  • Blue cardstock 5 x 3
  • Stars cuttlebug folder
  • Silver mirror paper


Tri-fold shutter cards again look complex, but they are fairly easy.  Score the base at 2, 4, 8, & 10.  Then measure down 1 1/2 inches and cut between the 2 and 10 inch scores.  Then flip the card over again cut betweent he 2 and 10 inch scores.  I ran the blue paper through the cuttlebug using the Sars embossing folder. I cut each piece down to fit within the score lines (taking off about 1/4 fo an inch) on the sides.

Gift of Cards (Part 7)

This one is super simple!

Supplies:
  • Brown shimmer paper
  • Scraps of yellow and purple ribbon
  • Computer generated sentiment
  • Popdots


I cut 2 bunnies out of the brown shimmer paper using Gypsy Wanderings.  I didn't want the cutouts from the bunnies, but unfortunatley those couldn't be hidden, so I just cut them  from the scrap.  I tied a different bit of ribbon to each of the bunnies.  I used a heart scallop punch to "bite" the bunnies. 

I popdotted them to the card.  I printed the sentiment on my computer and then hand drew the chat bubbles around them.


Gift of Cards (Part 6)

I saw this card idea in a magazine and thought it was hysterical. 

Supplies:
  • White 6 x 4 1/2 card
  • Copper shimmer paper
  • Green shimmer paper
  • Popdots
  • Computer generated sentiments


 I cut 2 frogs, leprechan's hat, a shamrock border and 2 shamrocks out of green shimmer paper from Paper Dolls Dress Up.  I put 3 small popdots on each of the frog legs.  I then glued the center of the frogs together.  The popdots make the legs stick up a little.  I popdotted the hat onto the frog.  I also popdotted the sentiment on the front and the shamrock border.

Gift of Cards (Part 5)

This is called a swing (or flip flop) card.  Again, it looks pretty complext, but it is quite easy to make. 

Supplies:
  • Purple shimmer paper 6 3/4 x 5 1/2
  • 2 pcs white cardstock 3 3/4 x 2 3/4
  • Pink shimmer paper
  • Red shimmer paper
  • Black cardstock
  • Black ink
  • Clear embossing powder
  • Heat gun
  • Popdots


Measure in 2 3/4" and then score down from 0 to 1 1/4 and 4 1/4 to 5 1/2.  Flip the base over and then repeat the first step.  Next turn the cardstock a quarter of a turn, measure in 1 1/4" and cut from 1" to the score line.  Lift up the cutting blade and cut from the score line again down to 5 1/2".  Again do this on both sides.  Adhere the white rectangles in the center of the cutout you have just made.  I cut the heart from the pink shimmer paper using Home Decor.  Using the blackout feature I cut the same heart from the red shimmer paper.  I cut the music notes from Hannah Montana out of the black cardstock.  I then inked the notes and sprinkled them with the clear embossing powder.  I melted the embossing powder with the heat gun and then reapplied the powder and heated three more times togive them a nice glossy sheen.  the hearts are attached to the front and the back of the rectangle with popdots.

Gift of Cards (Part 4)

This is called a wiper card.  They look very difficult, but they are quite easy! 

Supplies:
  • 2 pcs white cardstock cut at 6 3/4 x 4 1/4
  • Pink shimmer paper
  • Red shimmer paper
  • Cream shimmer paper
  • Glitter
  • Computer generated sentiment


I found a video for this type of card which makes it much easier than trying to type out all of the instructions. 


I cut the cupcake from Home Decor, once out of the pink and once out of cream and then using the blackout feature I cut it out of red.  I cut the cherry out of red and colored the stem brown with a marker.  I added a bit of glue to the cherry and coated it with some glitter.

Gift of Cards (Part 3)

The photos didn't come out as clear as I would like, so I will apologize from the start for the lousy photo quality.  This is a combination easel and shaker card.

Supplies: 
  • 1 pc of White cardstock cut at 8 x 3 1/2 and scored at 2 and 4 inches
  • 2 pcs of Silver metalic cardstock cut at 4 & 3 1/2 and scrap 3 x 3/4"
  • 2 pcs acetate cut at 3 x 2 1/2
  • Scrap pink & purple shimmer paper
  • Computer generated sentiment
  • Popdots (a lot!)
  • Clear star charm


Easel Part
The base is scored at 2 and 4 inches.  The top of the base has a rectangle cut out of it (measuring in 1 inch on all sides) where the shaker part is attached to ensure that the base is not as visible through the star.  The front of the easel is attached only to the 2 inch score line.  The star charm is placed on the inside of the base. 

Shaker Part
Using George, I cut out a star from each of the metallic pieces of cardstock.  A piece of acetate was taped to the  back of each of these pieces.  Popdots were put on one of these pieces to block in the star shape and also in each corner.  I cut out 2011 from the pink and purple shimmer paper and placed inside the enclosed popdot area.  The other piece of metallic paper was then adhered to the other side of the popdots (making sure the stars lined up perfectly).

Gift of Cards (Part 2)

This card is the first in the series of holiday cards I am making for my friend Jonathan to send to his daughter.  This card is intended for Christmas 2010. 

Supplies:
  • Blue cardstock cut at 12 x 5
  • White cardstock (scraps)
  • Green cardstock (scrap)
  • Pink cardstock (scrap)
  • Marshmallows & packet of instant hot chocolate
  • Small plastic baggie
  • Velcro dots


The base of the card is scored at 1 1/4, 6 1/2 and 7.  At the top of the 1 1/4" section, I put a velcro dot to hold it closed.  I put the velcro dots together to get the other dot perfectly aligned on the other flap.   Using my paper tirmmer, I cut the rectangle out of the base to show the "snowman poop"  The poem is computer generated and printed on white cardstock. 

The snowmen were cut from Doodlecharms using the border feature.  I hand drew the faces and the dots.  The carrot noses were cut with the shift of the border feature.  To save paper, I cut them on white cardstock and just colored them with an orange marker.  The hats were cut from Paper Dolls Dress Up and Paper Dolls for Everyday. I used a white opaque pen to color the balls white.

In case you can't read the poem, here it is (Author Unknown):

I've heard you've been naughty
So listen, here's the scoop...
I'm running short on coal this year
So here's some snowman poop!

Gift of Cards (Part 1)

For Christmas, I am making my bestie Jonathan a box full of cards to send to his daughter throughout 2011.  So this is going to be a series of posts that will show each card separately.

First off, I started with a gift box that I found in the Christmas section at a local department store.  I covered it using some paper I had from Close to My Heart.


CARDS was cut out using George once on designer paper and once on white cardstock using the shadow feature.  I hand made the pocket for the stamps.  Stamps is computer generated and printed on white cardstock.  I then ran it through my Cuttlebug using the stamps diecut.

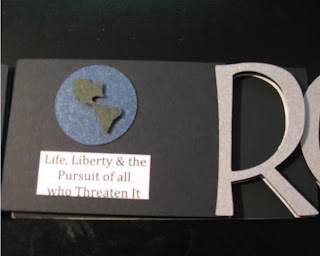
Veteran's Day "Hero" Wordbook

My church honored our veteran's on 11/14/10 and had me make Wordbooks for each of them. I made 10 of these books for the church (we handed out 4) and I made 6 for a company of Marines (http://www.anysoldier.com)/ I decided to "adopt" who are currently deployed in Afghanistan and I made 3 more for my Dad and my bestie Jonathan who were both Marines and for my friend Bobbie's son who will be retiring from the Army.

I absolutely love how these turned out and I hope that each person who received them will know how much their sacrifices are appreciated.

(The photos are from the one I made for Bobbie's son - the others did not have the Army insignia on them and the "Thanks" was under the H. This is also prior to binding them. My brother made 3 rings for each one to bind the left side so the pages easily flip.)


The pages of the book are made using the rectangle and letters from George. I cut each page from a medium weight poster board and covered the poster board front and back with black cardstock. I cut out two of each of the letters from glitter paper and pop dotted them to the front and back of each page. All of the other cuts are from Stand and Salute using Shimmer Paper. The sayings were all computer generated and printed on white cardstock.

My Craft Space

I wanted to start out this blog with a few photos of my craft space. It is just a corner of my livingroom. Some day I would love to have a whole room devoted to crafting, but if I did, my family would never see me! So for now a corner of my livingroom works well to craft and still spend time with my family.


And as you can see, one of my cats (Scamp) loves to be in the middle of all the action! The wolf rug and shelf were made by my Dad. So that is my crafting corner.

Please be sure to stop in again and often. I am going to try to post at least once a week.